
Sigil 101 (strategy guides by Sigil designer Andreas Voellmer)
Sigil 201
Gameplay Videos
Sigil Strategy 101 – Stone Advantage, Dashing & Surrounding
In these posts I’ll be giving a big-picture overview of how I approach strategic decision-making in Sigil. The basic rules of the game are simple enough, but if you haven’t developed heuristics for which parts of the board to focus on, the decision trees that spring up in the midgame can be overwhelming.
Hopefully these posts can provide some tools to cut a path through that jungle! I’ll assume you already know the rules (if not, check out the tutorial at sigilbattle.com) and have played a few games.
We’ll start by reviewing some of the basics, and progress to more advanced topics in the Sigillic Arts as we go.
Stone Advantage & Dashing
The goal of Sigil is to gain a 3-stone advantage over your opponent, and every decision has to be weighed in terms of how it affects the stone counts.
If you have a stone advantage, you’re closer to winning the game, and you also have more resources to burn in a pinch.
One way to use excess stones is by dashing– sacrificing two stones to make an extra move. Under normal circumstances, this is a terrible idea, because it puts you down a stone! You should virtually never dash in the early game, or just to fill a spell faster.
The best time to dash is when you’re able to recoup the lost stone somehow through the extra move– perhaps you’re able to cast a spell for a stone advantage, or crush a surrounded enemy stone.
“Dashing to crush” is a common play pattern that will leave the stone counts at parity. But there are some circumstances where you can gain a long-term positional advantage by dashing, even though it puts you down a stone in the short term. Perhaps the most common scenario like this is when you can surround a large group of enemy stones.
Surrounding Enemy Stones
At its heart, Sigil is about fighting your opponent for territory, and trying to surround enemy stones.
Many fine-grained tactics involve patterns of stone placement to push enemy stones into positions where they can later be surrounded.
Ideally, you’d like to keep your own stones on the “outside” and your opponent’s stones on the “inside”– if you can close off the perimeter around a group of enemy stones, you’ll probably win, because you can move into the group and crush a stone each turn.
Even if the surrounded player tries to push your perimeter back, they’re only enlarging their surrounded group, and you’ll still be able to crush one each turn.
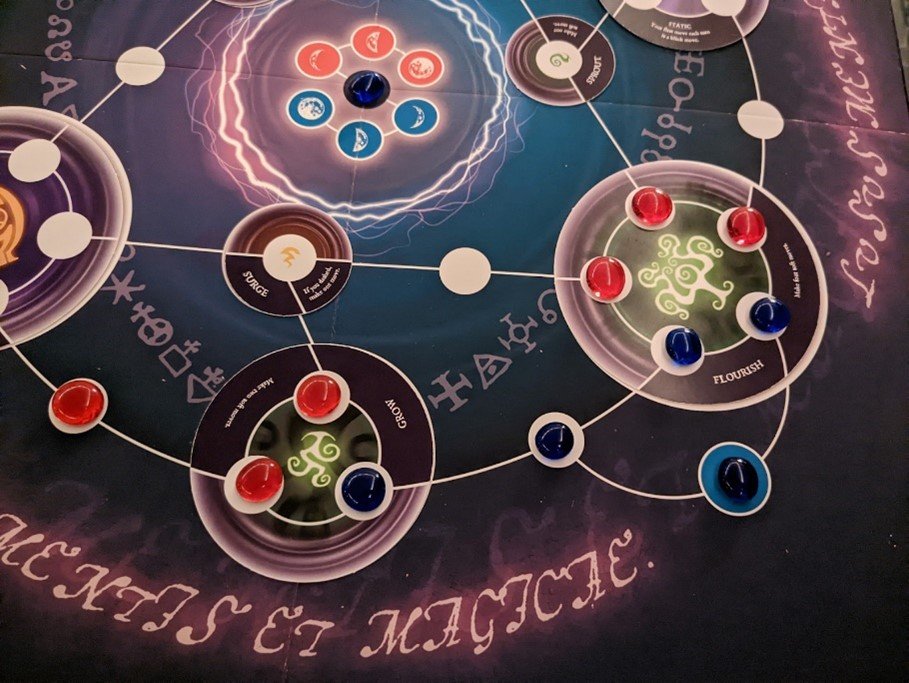
In this position, blue is done for– red will move into the blue group, crushing a stone and gaining a one-stone advantage each turn. Even if blue tries to push back the red stones, they’re only making a larger surrounded group, and red can still crush a stone each turn.

In this position, though, blue has a way out. Although their group is technically surrounded right now, blue can create an opening by pushing into one of the red stones in Flourish, and shoving it into one of the adjacent “void nodes” that aren’t part of any spell.
In the first scenario, red is guaranteed to win, so it doesn’t matter if they had to dash while getting there.
In the second scenario, though, blue is still doing fine, so dashing wouldn’t have been worth the sacrifice. To borrow some terminology from Go, the first blue group is “dead” and the second is “alive”. An important skill in Sigil is being able to quickly distinguish dead groups of stones from live ones.
There’s a lot more to be said about the tactics of pushing/crushing enemy stones, but to summarize, the basic goal is to form a perimeter around the enemy and avoid getting trapped in such a perimeter yourself.
In the next installment we’ll learn more about Board Positioning & Backfilling Spells.
Strategy Tips:
Assess your plans by measuring whether they will give you a stone advantage. That’s always the goal.
Surrounding a large group of enemy stones will give you a stone advantage by crushing on every future turn, which is a surefire path to victory.
Sigil Strategy 101 – Board Positioning & Backfilling Spells
While tactical combat dynamics (dashing & surrounding) are a central part of the game, they’re deeply interwoven with the spellcasting system.
Spells are not drawn from a “spell deck” off to the side– they literally are the very territory you’re fighting over.
Therefore, all your tactical combat decisions– when to commit to the fight? When to retreat?-- must be colored by broader strategic concerns about which spells you and your opponent are hoping to cast.
Let’s look at an example of this:

Here red is making an incursion into blue’s territory. Should blue defend their Flourish by pushing the red stone out, or is it wiser to start building into Fireblast?
Well, it depends in part on where the red stone will be pushed.
In this case, it would end up in Hail Storm, a very powerful spell that red would be happy to fill.
If blue decides to “draw the battle line” at the entrance to Flourish, pushing away any red stones that poke inside, then with each push they’re helping red fill up powerful spells like Hail Storm and Bewitch.
It’s probably better here for blue to abandon their dreams of casting Flourish and instead move into Fireblast– that way, if red keeps aggressively moving forward, they’ll be highly exposed to a devastating Fireblast.
Backfilling
When red stones and blue stones clash, if neither can surround the other, then both will be pushed into whatever territory is behind them. I like to call this process backfilling.
In situations like these, it’s critically important to ask yourself “Which color is backfilling stones into more valuable territory?”
If you’re happy with the territory behind your stones, go ahead and pick a fight; but if your opponent’s backfill looks more appealing, it might be best to expand somewhere else instead.
The best territory to backfill is a powerful spell that you’ll be able to cast; the worst is void nodes or a locked spell.
Look for opportunities to push your opponent into their locked spell or void nodes whenever possible.
In some situations, you’ll want to stand your ground in a fight for a turn or two, pushing your opponent to backfill a couple void nodes; then when your next push would send them into an unlocked spell, it’s time to withdraw from the fight and deploy your stones elsewhere.
Here’s another example:

Red has just filled up Bewitch and would like to cast it. Which stones should they convert?
Whatever they choose, it’s likely to start a fight in which players are pushing back and forth into each other, and the territory behind them is getting backfilled.
So, red should convert stones that have the strongest backfill. In this case that would probably be Fireblast (along with the void node next to it). That leaves blue with the unappealing option of pushing the red stones into Fireblast in order to defend their mana.
Strategy Tips:
Look for opportunities to push your opponent into their locked spell or void nodes whenever possible.
If you’re pushing your opponent into the prime real estate of unlocked spells, perhaps you should be moving somewhere else instead.
Sigil Strategy 101 - Mana Advantage
Let’s shift gears and talk about mana.
These are by far the most important nodes on the Sigil board.

If you can take and hold 2 of the 3 mana, you’re strongly favored to win the game. That’s because most spells will leave you at stone parity if you cast them with just 1 mana, but will put you up a stone if you cast them with 2 mana.

Flourish and Grow, for instance, are parity with 1 mana and give you an extra stone with 2 mana. Many other spells follow this pattern too. If you can secure 2 mana, then every time you cast a spell (other than 1-node spells, of course), you’ll go up a stone, and that’s a sure recipe to win.
So how do you secure 2 mana?
The most straightforward way is just to march right across the board one node at a time and grab the neutral mana. If you can fill up a nice 3-node or 5-node spell along the way, great! You’ll be ready to cast it as soon as you reach the mana.
Your opponent’s starting mana is a juicy target too, of course, but if you just start marching straight at your opponent they can simply push your stones away.
This kind of approach will only work if you have a powerful aggressive spell to supplement your attack– Carnage or Seal of Lightning, for instance, can enable strong early-game pushes towards the opponent’s starting mana.

In many cases, a good starting point for your Sigil game plan should be to think about moving towards the neutral mana and claiming it as quickly as possible.
Spells like Grow and Flourish can help you do that– don’t be afraid to use them to accelerate towards a second mana. One of my favorite openings is casting Flourish on turn 6, keeping the stone closest to the neutral mana, and making four soft moves towards that mana (pictured below).

In the next installment, we’ll start to explore some Sigil joseki (another term borrowed from Go)-- common patterns of moves and counter-moves that every strong player should have in their toolkit. Until then, I hope you enjoy exploring the intricacies of the Sigil, and can’t wait to see what new strategies you discover!
Strategy Tips:
Claiming and holding 2 mana will give you a stone advantage every time you cast a spell, which is a surefire path to victory.
If you have control of aggressive spells, you may be able to attack your opponent’s mana, otherwise your best path to victory may be the neutral mana, or trying to surround your opponent.
Sigil Strategy 201: Joseki
One of the main inspirations for Sigil is the ancient and beautiful game of Go, which has accumulated a huge body of intricate theory and special vocabulary over a span of more than two millennia. The core mechanics of the two games bear a strong resemblance, and some classical concepts of Go strategy can be readily applied to Sigil– for instance, the first installment of this series discusses life and death for groups of stones, which works in a similar fashion for both games.
This installment will go over some common Sigil joseki.
In Go, joseki are common patterns of moves and counter-moves that are viewed as strategically optimal for both players, at least when taken in isolation from the broader game state.
Memorizing joseki can be good training, but strong players must also know when to deviate from their rigid proscriptions if circumstances call for it. The same advice applies here: a strong Sigil player should know their joseki, but never follow them blindly.
First, though, let's establish our notation.
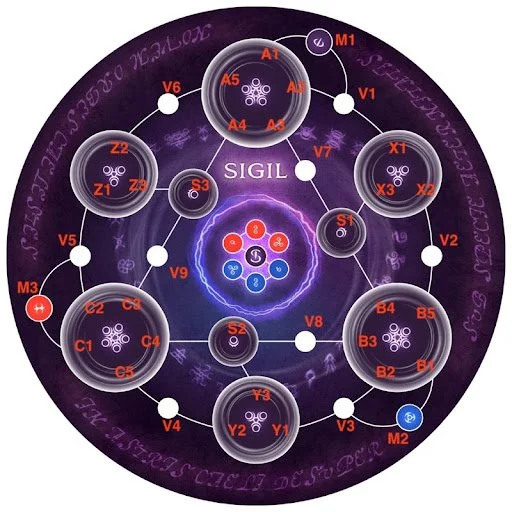
We'll refer to the 39 nodes of the Sigil board using these letter/number combinations. M1-3 are mana, V1-9 are void, S1-3 are small (one-node) spells, ABC are the 5-node spells, and XYZ are the 3-node spells.
Sigil Strategy 2.01: Exposed 1-Node Spells
Take a look at this boardstate:

Imagine that you are red and place a stone on Sprout.
On blue’s turn they can push your stone off of Sprout into an empty void node (V8), and then cast Sprout for an effect. Stones in void nodes tend to be less impactful on the game as they do not contribute to your ability to cast spells.
The lesson here is that while placing a stone into a 1-node spell can often be a nice way to save up potential energy for later, you must be very careful about doing so if your opponent is adjacent to the spell too, since the pattern of pushing you out + immediately casting it can be used to their advantage.
In the scenario above, both players would probably be wise to treat the Sprout as a kind of “no man’s land” separating their territories– whoever moves onto it first will be vulnerable to this play pattern.
Of course, this rule only applies if casting the small spell immediately is a viable option; Sprout and Slash can almost always be used in this way, but Comet and Surge are a bit more situational.

Your opponent may not want to push you out of Comet and cast it that same turn, because casting Comet puts them down a stone. So it’s safer to place a stone in Comet even if your opponent is also adjacent to it.
SUMMARY:
An easy-to-cast 1-node spell like Sprout or Slash is a good way to “store up potential energy” and unleash multiple moves at once on a future turn.
Be careful if your opponent is also adjacent to your 1-node spell; they can knock you out and immediately use it themselves.
Sigil Strategy 2.01-2: Attacking and Defending Mana
Mana are the most important nodes on the Sigil board as they make your 3- and 5-node spells more efficient.
The most common way to win a game of Sigil is to secure 2 of the 3 mana and then cast spells (just about any 3- and 5-node spells will do), gaining a stone advantage each time.
However, mana are also the most vulnerable points for an enemy to attack, since they are so easily surrounded. For instance, a Blue stone on M2 can be surrounded by Red stones on V3 and B1 (see sigil notation):

Try not to let your mana get surrounded, and if it does, fight hard to keep it alive!
In the picture above, Blue is surrounded but the stone is still technically alive– if it’s Blue’s turn, they can move onto B1 (on top of the right red stone), pushing the Red stone to B2 or B5 (the empty nodes adjacent) and creating an opening for their stones.
But if Red wanted to finish the job, they could reply by moving + dashing to crush the Blue mana. Red wouldn’t get a stone advantage from crushing Blue (since dashing to crush keeps the stone count at parity), but they would have secured this mana, along with a strong perimeter of Red stones around it. This will make it hard for Blue to contest the mana as the game goes on. In many scenarios this is enough for Red to gain a major long-term advantage.
A common way for an attack on mana to unfold is something like this:

Red has been moving straight towards Blue’s starting mana each turn, while Blue has just finished filling and casting Flourish, leaving a stone on B4 and then making soft moves into S1, X3, X1, V1 in a race to grab a second mana and then cast Grow for a +1 stone advantage.
In their haste to secure M1(the neutral topmost mana), M2 is now highly exposed. Red has just moved into V3 and the battle for Blue’s starting mana is now underway.
It’s Blue’s move, and this is a critical turn.
First let’s explore what happens if Blue simply sticks to their original plan and plays into M1, preparing to cast Grow with 2 mana on the following turn.
Red could move directly into M2, pushing the Blue stone to B1, but a better move for Red is B2. Red is then threatening B1 on the following turn, fully surrounding the Blue mana with no hope of escape. Red might choose to dash on the same turn as well (perhaps sacrificing V4 and C5), crushing the Blue mana and securing a strong perimeter around it.
While it's true that Blue will cast Grow and go up a stone, they'll be left in a position where Red has 2 mana and can likely recover the stone advantage with another spell, like Hail Storm, followed by Flourish or Starfall.
Blue doesn't have any clear way to win back a mana (Bewitch could help with this eventually, but it will take time and Red will be well prepared). In my opinion this is a weak position for Blue, despite their temporary stone advantage.
The better option is for Blue to fight back and defend their mana.
In most cases, B2 is the critical node that determines who will control the mana. If Red is able to start their turn with a stone on B2, they can move to B1 and dash to crush the mana. So Blue needs to keep pushing Red off of B2 to keep the mana safe.

Starting from the picture above, Blue's best defensive option is B1. (Blue V3 would be a disaster– it pushes Red to B2, then Red plays B1 and Blue is surrounded.)
After Blue B1, Red presses the attack with B2. As we just noted, Red is now threatening to play B1 + dash to crush M2. Blue must respond with B2, pushing Red into B3. Now Red can try B2 again, and Blue will push them off again. Here we have a common joseki: pushing back and forth on A2/B2/C2, where the attacker is threatening to steal the defender's mana if they take a turn off.
There are several ways this battle can be resolved. The defender might decide they have better things to do and concede the mana. Or, one player might eventually backfill a spell and cast it as their stones are pushed off B2– for instance, Red will eventually fill Hail Storm in the scenario above.
There's another option available to the attacker here, which leads to a variant form of this mana-skirmish joseki. After being pushed from B2 to B3, instead of re-playing on B2, Red can try to loop around the top of the defender's position by playing B4:

In this line Red is giving up on the B2 skirmish, but setting their sights on a grander ambition: to come down through B5 and then B1, surrounding a larger group of Blue stones, and positioning themselves to cast the 5-node spell (Flourish, in this example) as well.
Of course, the defender can challenge this attack by pushing back B4; but in some situations, the resulting pattern of backfills may be more to the attacker's liking.
In the present example, S1 (Comet) is already controlled by Blue, but if it were empty, the attacker would be pushed into it when the defender plays B4. Depending on which spell is S1, this could give the attacker a leg up in the fight– Slash or Surge, in particular, could give the attacker enough momentum to swoop down through B4, B5, B1 and claim a decisive victory in this skirmish.
SUMMARY:
ABC-2 are the critical nodes to control when fighting over mana.
After getting pushed off ABC-2 by the defender, the attacker can also try for an even bigger surround with ABC-4. This is especially strong if the adjacent 1-node spell is empty and will help in the attack.